- For the same-titled episode this location is featured in, see Dark Room.
"Jackpot. Do I even need to say how weird this is?" - "You just did. Who builds this kind of place?" - "A Prescott, of course." — Max and Chloe in "Dark Room"
The Dark Room is a secret bunker hidden under the Prescott Barn, initially intended as an emergency shelter yet eventually used by Mark Jefferson for his illegal photographing of vulnerable girls. Fitting both purposes, it is filled with survival supplies and expensive photography equipment.
Appearance and Interior[]
The underground fixture has several sections, including the hallway with the stairway that leads to the other section that is the bunker, which is separated into a dark room and a storage room. The ceiling tiles in both the storage and dark room are brown with squares on them and every couple of tiles there is a sprinkler. There is only one in the storage room and several in the dark room. There are also vents placed sporadically on the ceiling and on the upper parts of the walls. The storage and dark rooms are separated by a transparent vinyl curtain attached to the ceiling. Upon entering, there are shelves full of survivalist supplies; mainly food and water, similar to the stocks kept in the garage of the Madsen household by David Madsen. However, turning the corner, there is a more sinister air to the setup, as the room turns into more of a lounge/photography studio.
Hallway[]

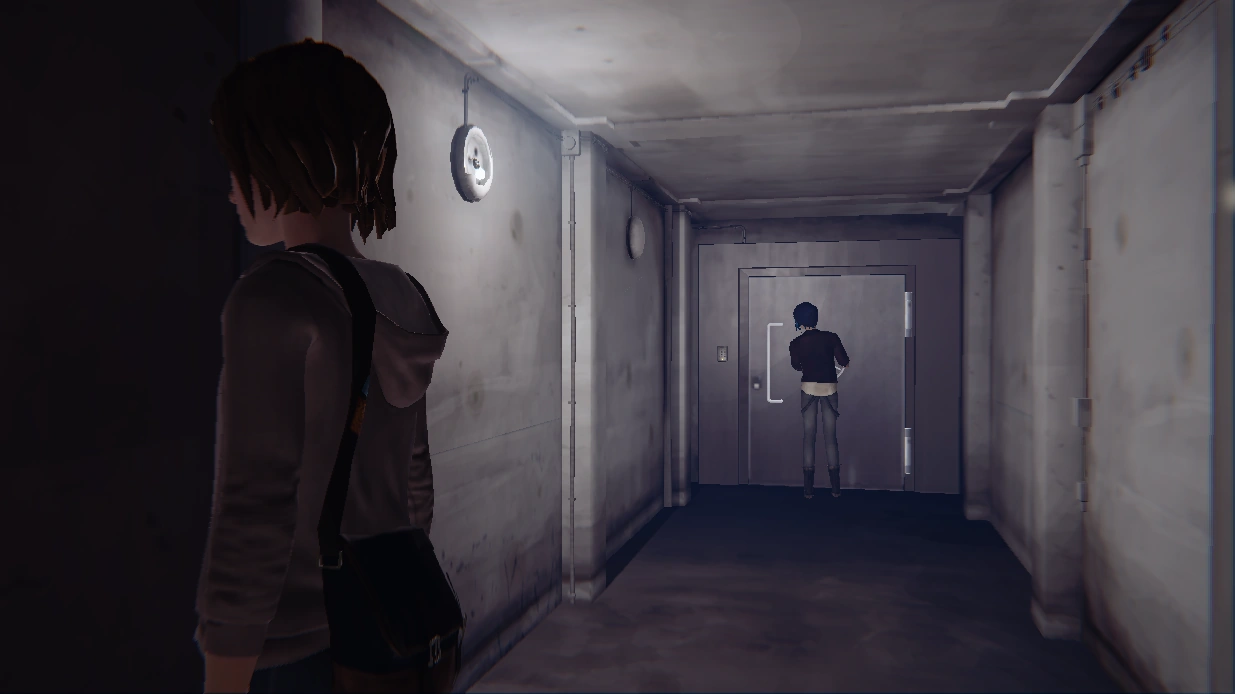
Picture of Chloe attempting to open the door at the end of the hallway.
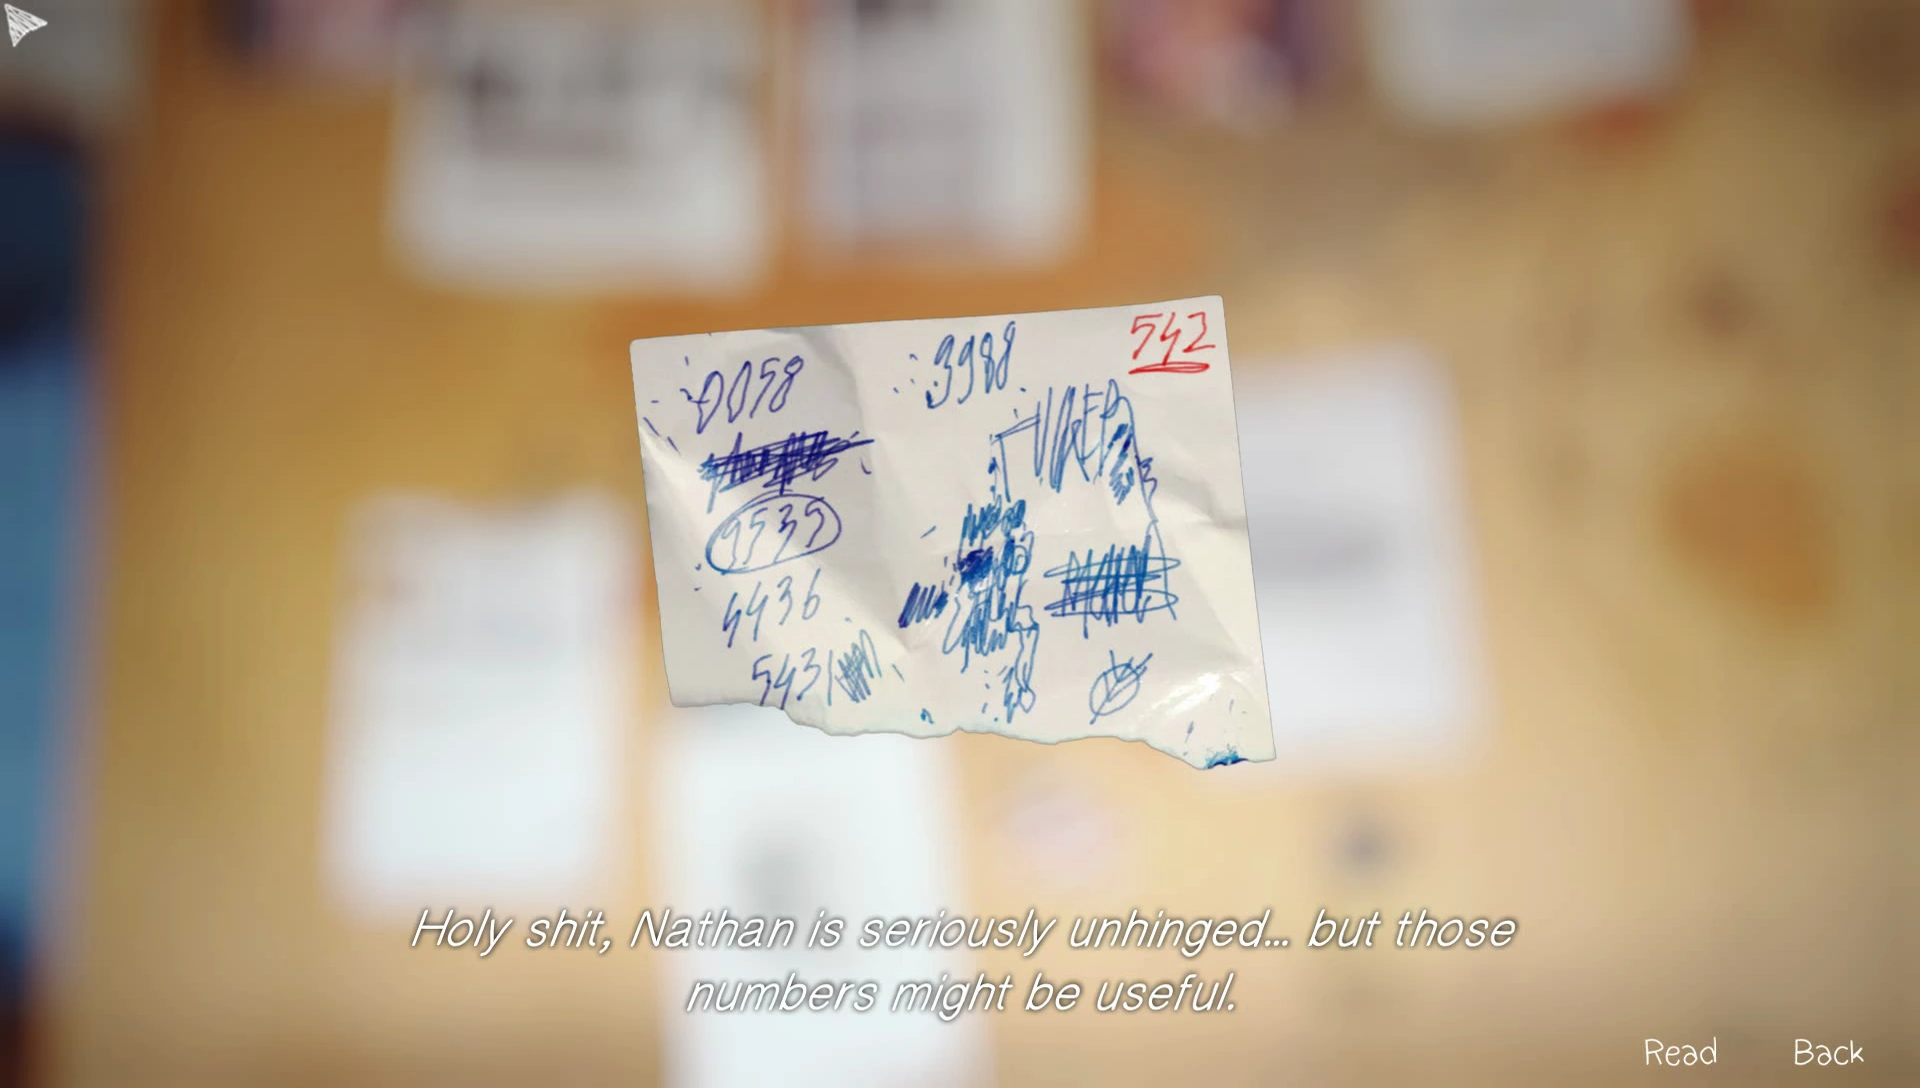
The hallway is short, aged, dirty, and dingy with a circular light fixture on the wall as well as another circular fixture which function is unknown. A vault-like door and keypad lie at the very end of it. The door leads to a storage and dark room area; it is secured by a spinning wheel and a bar-type handle. Both are metal and the door is "too heavy to break," according to Max Caulfield. The keypad's combination is 542, which can be gleaned from the three most worn keys on the keypad itself or discovered from a scrap of paper Nathan kept hidden in his dorm room.
Storage Room[]
The storage room has various nonperishable food items such as boxed cereals, bouillon, water, and canned mushrooms. The room has a counter on the wall opposing the door with a very large sink and a shelving unit next to it. The shelving unit has possible cleaning agents or containers of nonperishable food items, napkins, towels, and a large pot. On the counter next to the sink, there is one water bottle, a roll of paper towels, duct tape, two prescription pill bottles that are likely Nathan Prescott's, and a letter from Nathan's psychiatrist expressing disappointment in his father's neglect and stating that Nathan can no longer be treated; as the father refused to acknowledge his role in causing Nathan's problems, he himself is an obstacle in Nathan's treatment. On the other side of the counter, there is a large tank that contains water connected to the sink. The shelves above the sink have beakers, hand towels, paper towels, and a lockbox. The only things Max can interact with in this part of the storage room are the letter and duct tape. There are three drains on the floor surrounding the counter.
On the wall to the right of the door, there are four shelving units - only one of them has wheels. The shelving unit closest to the door is half the size of the rest of the shelves with food or cleaning agents on it, and it is the one with wheels. The next shelving unit on this wall has nonperishable food and drink items as well as two boxes. After this, the next shelving unit also contains food or cleaning agents. The final shelving unit on this wall contains sanitation items such as paper towels, napkins, and large rolls of bathroom tissue. It has a bucket and a metal pan with uses that are unknown. This shelf is also half-size.
")
")
")
")
")
")
Dark Room[]
Tortured guro images adorn the walls in the bunker; presumably put up by either Nathan or his father, as the style is more similar to Nathan's than that of Mr. Jefferson. Needles sit on one of the side tables, obviously used for sedating the victims or those involved. Duct tape also appears here, used to restrain the drugged girls.
There is a small entertainment center located on the far right wall containing a stereo, a radio, and several other electronic devices. A couch wrapped in clear vinyl is in the center of the room with two tower speakers on either side of it and a sleek table in front of it. On the table is a bottle, a phone on a dock or charger, and an Arcadia Bay Beacon newspaper. Both speakers are plugged into some electrical source under the couch. The cabinet next to the entertainment center has alcoholic beverages, sealed boxes, boxed shot glasses, and several cameras.
")
")
")
")
")
")
")
")
Studio and Photography Equipment[]
The dark room has a big white screen acting as a backdrop for photos. There are several large light sources such as two softbox lights and two umbrella lights. Four tripods are visible, but only one is interactable. A small circular fan is also in the lower left corner of the white screen. Bordering the screen are numerous black crates with some acting as tables. To the right of the screen, a large black screen rolled and attached to tripod-like stands on either side is present. Behind the couch and entertainment system there is a desk with a tower computer and large monitor. On the desk, there is a letter from Sean Prescott to Nathan addressing his school suspension if Max chooses to blame him. Taped to the computer monitor is a ripped note informing Nathan that his father is displeased with his phone usage and attitude. Behind this desk, Max can find a cabinet containing binders with photos of the dark room victims. There is a Cintiq screen on a table near the desk, and on the file cabinet next to this table there is a contract dealing with the construction of the bunker. On the same wall, there is a cabinet and two printers. One of the printers is interactable and designated for photos only.
")
")
")
")
")
")
")
")
")
")
")
")
Photos and Prints[]
There are five framed monochromatic photographs and one signed art print, possibly a block print, hanging on the walls of the dark room. One portrait-style photograph hangs above the printer, and the rest hang on the wall behind the desk. Two are portrait style and two are square. The square photos are significantly smaller than the portrait-style ones. The signed art print is portrait-style and hangs around the corner connected to the storage room. Three photos each of a drugged Kate Marsh and Rachel Amber are accessible from the cabinet behind the desk.
WARNING! This section contains disturbing images. Click here to skip it.
")
")
")
")
")
")
")
")
")
Episode Four - "Dark Room"[]
After Max's and Chloe Price's search for Rachel Amber leads them to the Prescott Barn, they discover a secret door to an underground bunker, with a heavily locked door.
If Max didn't allow Warren Graham to beat him up, Nathan's jacket is present in the bunker, meaning he was there recently. He was wearing this jacket when Max and Chloe ran into him at the Prescott Dormitory earlier. It is possible that he was also there with his father, considering that he mentions in the dormitory that his father was on his way to meet him there. There are also emails and notes for Nathan sent by his father in the bunker.
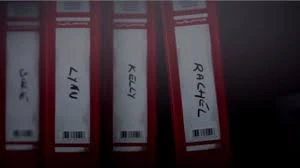
Red binders with names on them.
There is a bottle of whiskey in the bunker — a possible link to Principal Wells, who is a known alcoholic due to his stressful job at Blackwell.
Inside one of the cabinets, Max discovers mysterious red folders bearing the names of girls. The binders are full of incriminating sexual photographs of the drugged girls.
Kate Marsh has a binder full of these pictures; there is also an empty one for Victoria Chase. Lastly, Rachel Amber's folder contains many photos of her drugged, tied up, and passed out. There is a particular one which Max comments on, saying she seems "awake and furious." Rachel's last photo is of her with Nathan, posing in the Junkyard. It is unclear whether Nathan is drugged or not in the shot, but it is likely that he posed with Rachel and was conscious of his actions. Chloe recognizes the spot in the photograph, and the girls head there immediately.
Episode Five - "Polarized"[]
The episode begins as Max awakens in the Dark Room, tied to a chair. Victoria is lying beside her if she believed Max's warning at the End of the World party in the previous episode. A camera and several light sources are pointed at Max. Her bag rests atop a nearby create to her left, out of reach. To her right, there is a trolley with syringes and photos from the previous night. Max focuses on one of the photos and finds herself lying on the floor of the Dark Room, with Jefferson photographing her. Max eventually manages to push the trolley, spilling the drugs and damaging some of the photos, and returns back to present. This time, the photos put on the trolley are different. Max focuses on the one she's awake in and talks to Jefferson. He explains his motives and moves on to review the photos. Max notices her diary in the distance, rewinds time and asks Jefferson to give it to her. Afterwards, she focuses on the selfie from the first episode and moves back to her photography class.
Max finds herself in the Dark Room once again after tearing up her Everyday Heroes photo contest entry. Just as Jefferson is about to give her a lethal dose, David enters. With the help of Max's power, he manages to overpower Jefferson and frees Max. She may then walk around the Dark Room. Chloe's necklace can be found near Jefferson's computer - this can be taken. On the trolley there is an open binder with photos of Max in it. Before leaving the Dark Room, Max has a conversation with David, where she may or may not reveal the truth about Chloe to him. Afterwards, she says she needs some fresh air and moves on to rescue Chloe.
The Dark Room is also featured in Max's nightmare. She sits restrained to a chair and witnesses weird character dialogues. First, Chloe and Jefferson talk about modelling. They both say insulting things about Max, including everyone at Blackwell being over Max. Chloe and Warren then discuss being into each other rather than Max, and they kiss. Chloe then talks with Nathan, and they arrange to party and do drugs with each other. Chloe then dances in her underwear on the sofa for Max. Victoria then appears and she and Chloe make out with each other. Then Chloe appears in her paraplegic state and insults Max further. Chloe, healthy again, then takes pictures of Max, wishing she had never returned to Arcadia Bay. A flash of the camera transports Max to a new location.
Interactions[]
- Hover over the text to see Max's comments. See here for all interactions in the game.
Episode Four - "Dark Room"[]
- Max can look at the security door."This is too heavy to break, so I'll need a code."
- She can look at and use the digicode (required)."First a padlock, then a digicode... Someone really doesn't want visitors."
- She can look at the nonperishable food."More survivalist supplies..."
- She can look at the food cans."Look at these cans... David must shop at the same store."
- She can look at the water bottles."Water supplies. It's like in David's garage bunker..."
- She can look at the letter from Nathan's psychiatrist."Whoa, this says it all about Nathan... He needs help."
- She can look at the duct tape."Duct tape in a bunker is always a bad sign."
- She can look at the photo printer."I guess Nathan needs the most expensive printer in the world."
- She can look at the bunker's construction agreement."That son of a bitch..."
- She can look at some black and white pictures."Talk about tortured..."
- She can look at a note for Nathan."Whoa, what is going on between Nathan and his father?"
- She can use the computer in the Dark Room."Let's see what's in here... Oh my God... no..."
- She can look at a guro illustration."That's an original signed illustration. Fits perfect in here."
- She can look at a bottle of whiskey."Somebody likes their whiskey..."
- She can look at the newspapers."These newspapers are all about Rachel and Kate..."
- She can look at the needles."Needles... gross..."
- She can look at the drug vials.Frank alive: "This must be the crap that Nathan gets from Frank."
Frank dead: "Frank won’t be around to push this stuff..." - She can look at Nathan's jacket (determinant)."Oh shit, that's Nathan's jacket... has he been here recently?"
- She can look at a crate with photo equipment."I've never seen so much pricy equipment before."
- She can look at a tripod."So who’s using this fancy tripod?"
- She can look at a cupboard with an entertainment system inside."Ah, the apocalypse entertainment system."
- She can look at another cupboard with red binders inside (required).
- She can look at Rachel's binder."This picture is framed different. Rachel is awake and fucking furious."
"Rachel has passed out and she has something in her mouth. What happened to her?"
"This shot is so staged, I can't believe it's real... I can't..." - She can look at Kate's binder."Kate looks so doped up. She has no idea she's being posed."
"At least Kate was asleep through all this bullshit."
Episode Five - "Polarized"[]
At the beginning of the episode,
- Max can try to break free from the straps (required).Right foot: "Finally! I'm free! Almost..."
Other: "These straps hurt..." - She can look at and pull a trolley towards herself (required)."If I could move it towards me..."
- She can look at a syringe on the trolley."God, I don't remember anything that happened...
This must be the same drug Nathan used on Kate." - She can look at and focus on a photo of herself (required).Look: "Oh shit... that's me! He took that shot last night."
Look closely: "I hate looking at myself like that. You'll pay for this, Jefferson."
Focus: "This might work. Please work..." - She can look at her belongings."Great. I can see all my things, but I can't grab it..."
- She can look at her cell phone."Of course... and right in front of me..."
- She can look at and speak to Victoria (determinant).Look"Oh shit, Jefferson kidnapped Victoria, too? This is so bad."
Speak: "Victoria... Wake up! Wake up!"
After returning to the Dark Room,
- Max can have a full conversation with Victoria (determinant).
- She can look at a broken vial."So I definitely knocked those syringes over during my focus...
I changed something! Keep going, Max!" - She can look at the old photo."No... that picture isn't going to help. And I can't go through all that again. I won't."
- She can look at the damaged folder."Wait... Jefferson couldn't handle stains on his photos... Good. Now I can use them!"
- She can look at Jefferson's camera."I'd really like to smash that fancy camera into Jefferson's face."
- She can look at and focus on another photo of herself (required)."Whoa... I am definitely more awake in this photo... I could try this one."
During the focus,
- Max can look at her journal (required)."I have all those photos in my diary... This could be a way out."
- She can look at and focus on her selfie from the first day (required)."Oh my God... I could go all the way back to the moment this all started.
Max, this could be your chance to fix everything... for good."
After tearing up her contest entry, Max will be restrained in the Dark Room.
- Max can ask Jefferson to take an optional photo of her.
- She can ask Jefferson to play some music.
- She can ask Jefferson to turn off the lights.
- She can ask Jefferson for some water (required).
- She can warn David about the tripod."David, watch out!"
- She can push the trolley to help David (required).
- She can tell David to use several items against Jefferson:
- Bottle"Grab that bottle!"
- David's gun"Grab your gun now!"
- Camera"Get the camera next to you!"
- Table"David, kick that table!"
- Warn about Jefferson's gun."He's hiding a gun over there!"
- She can pull a cable to distract Jefferson (required).
Once free from the straps,
- Max can look at and speak to David (required)."David Madsen is on the case... He's still looking for evidence."
Tell the truth: "Hold tight, David... I'm going to fix everything." - She can look at Mr. Jefferson."Jefferson looks so... pathetic now."
Hide the truth: "I'm glad that freak is tied up, but... I still feel like I'm in shock.
I can't believe this is real."
Tell the truth: "I can't believe Jefferson is dead." - She can look at the chair."I can still feel those straps... Stop, Max. You're free."
- She can look at Jefferson's camera."All this expensive gear just for... sick bullshit."
- She can look at a syringe."Just looking at that makes me want to vomit."
- She can look at photos of herself."I hate looking at me like that..."
- She can look at her burnt diary."Damn, Jefferson torched everything... Now the only photo I can get is the one Warren took…"
- She can look at Victoria's bracelet (determinant)."Oh... That's Victoria's bracelet... I bet Jefferson was going to use that to frame Nathan."
- She can look at Jefferson's gun."No more fucking guns."
- She can look at the duct tape."So gross... I wonder if he charged that duct tape to Blackwell... Scumbag."
- She can look at the HiFi."Every song you hear in jail will be torture... You'll never be free again."
- She can look at the black and white photos."Nobody will look at Jefferson's work the same."
- She can look at a SpyGuy receipt."Looks like Jefferson was planning a major security renovation... with Prescott cash."
- She can look at a bus ticket to Los Angeles."No one would have looked for Nathan's body with this…"
- She can look at an Everyday Heroes Contest flyer."You won't be going, Jefferson... to any more shows."
- She can look at and take Chloe's bullet necklace.Look: "Oh, Chloe... I'm going to save you... for the last time."
Take: "There's no way I'm leaving your necklace here." - She can look at a drug vial."Frank isn't a bad person, but... he can't be in denial about the drugs he provided."
Before the Storm[]

The computer table in Before the Storm.
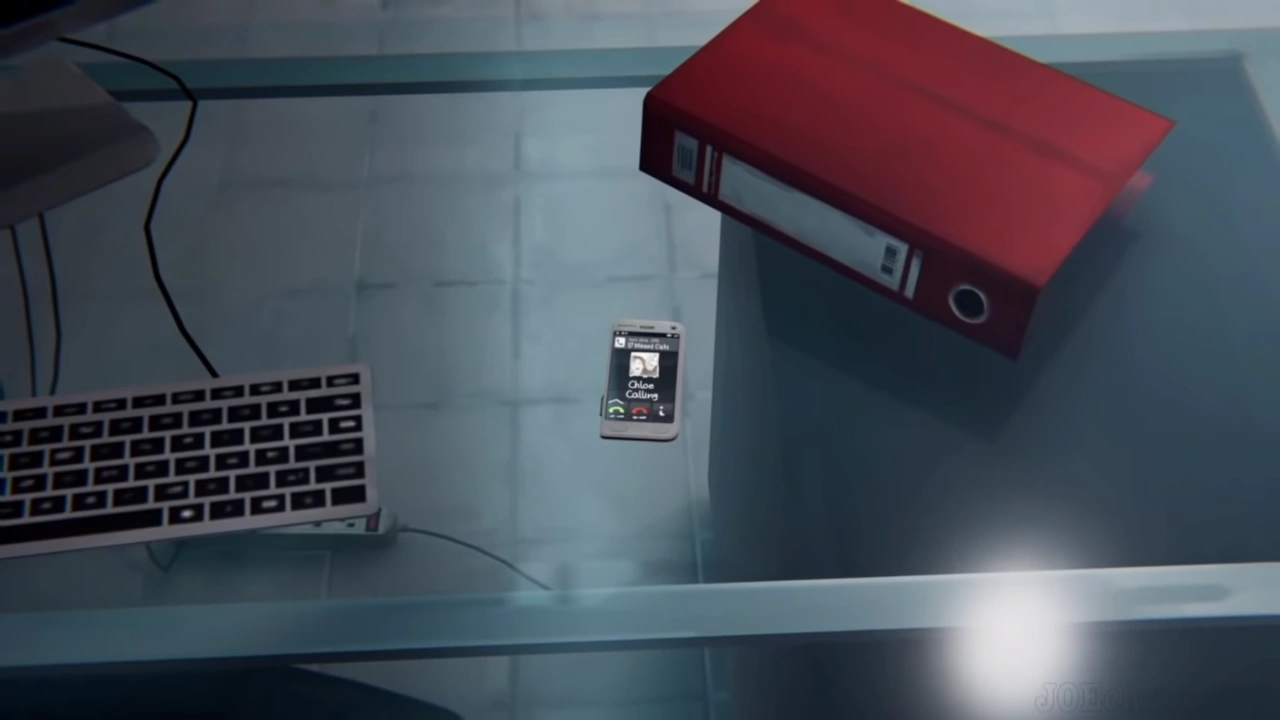
At the end of this prequel game, the computer table is shown with what is presumably Rachel's phone being repeatedly called by Chloe while the click of a camera can be heard in the background.
Trivia[]
- The code to enter the Dark Room is 542. It is present in red on the top left of a note by Nathan that is seen during the investigation puzzle.
- The Dark Room recently got equipped with a surveillance system worth a total of $4566 that is paid entirely by The Prescott Foundation, which is evident from a Spyguy receipt found in Episode 5. In the same episode, Jefferson tells Max that the surveillance is 24/7.
- The curtains separating the storage room from the actual studio appear to be in reference to the red curtains found in the Black Lodge in the TV show Twin Peaks.
- In Episode 5, right after Jefferson says to Max, "Sorry, I burned all your stuff. I got a little carried away", he actually adds something before saying, "Especially since you've developed from nerd to hero within a week". It's almost inaudible because of Max's comment "Fuck! He burned my diary! That's why I'm still here" completely drowns it out. The audio files confirm that Jefferson actually said, "You know, I always believed in your vision." For an unknown reason the dialogue wasn't subtitled.
- An important observation is that the terms "Dark Room" and "lighthouse" are polar opposites. They are also important locations and very central motives throughout the game.
- Max's hoodie and satchel were placed on the sofa in one of the promotional shots for Episode 5, "Polarized". In the game they are on top of crates instead.
")
")
Gallery[]
Concept Art[]
")
")
")
")
")
Life is Strange Locations
| |||||||
|---|---|---|---|---|---|---|---|
| Arcadia Bay | |||||||
| Arcadia Bay · ACFC Drive-Thru · American Rust Junkyard (Hideout) · Cemetery · Chloe's Truck · Police Department · Beach · Blackwell Academy · Frank's RV · Gas Station · Hospital · Lighthouse · Madsen Household (Bedroom · Chloe's Room · Garage · Bathroom · 2008) · Pan Estates · Prescott Barn (Dark Room) · McFlinn · Prescott Estate · Water Tower · Train Tracks · Rue Altimore · Harbor Inn · Two Whales Diner · Up All Nite Donuts | |||||||
| Blackwell Academy | |||||||
| Hallway · Main Campus · Parking Lot · Photography Lab · Prescott Dormitory · Principal Wells' Office · Science Lab · Swimming Pool | |||||||
| Prescott Dormitory | |||||||
| Max's Room · Dana's Room · Kate's Room · Victoria's Room · Nathan's Room · Custodial Room | |||||||
| Other Locations | |||||||
| Alternative Beach · Alternative Price Household (Garage) · Bean Hip Cafe · Kroft Gallery · Plane · Zeitgeist Gallery | |||||||